How to create custom settings (custom fields) in Gutenberg core blocks
This tutorial will explore the Gutenberg API and add custom options and functionalities to the Gutenberg core blocks. The example I will show you is very simple, but it will apply to a wide range of scenarios.
WordPress Gutenberg editor is powerful, but sometimes it has limitations that, as developers, we need to overcome to meet clients or project needs. I've found myself dealing with the need to extend core blocks to achieve results that otherwise would have requested the development of custom blocks. And that felt a bit like overkill it. This tutorial will explore the Gutenberg API and add custom options and functionalities to the Gutenberg core blocks. The example I will show you is very simple, but it will apply to a wide range of scenarios.
How to follow along
I've fired up a test website using Local WP by WP Engine. It's free, and it has fully supported versions for every major OS out there.
We will then use @wordpress/create-block to scaffold the plugin we will use in our project.
Here you can find the source code of the tutorial.
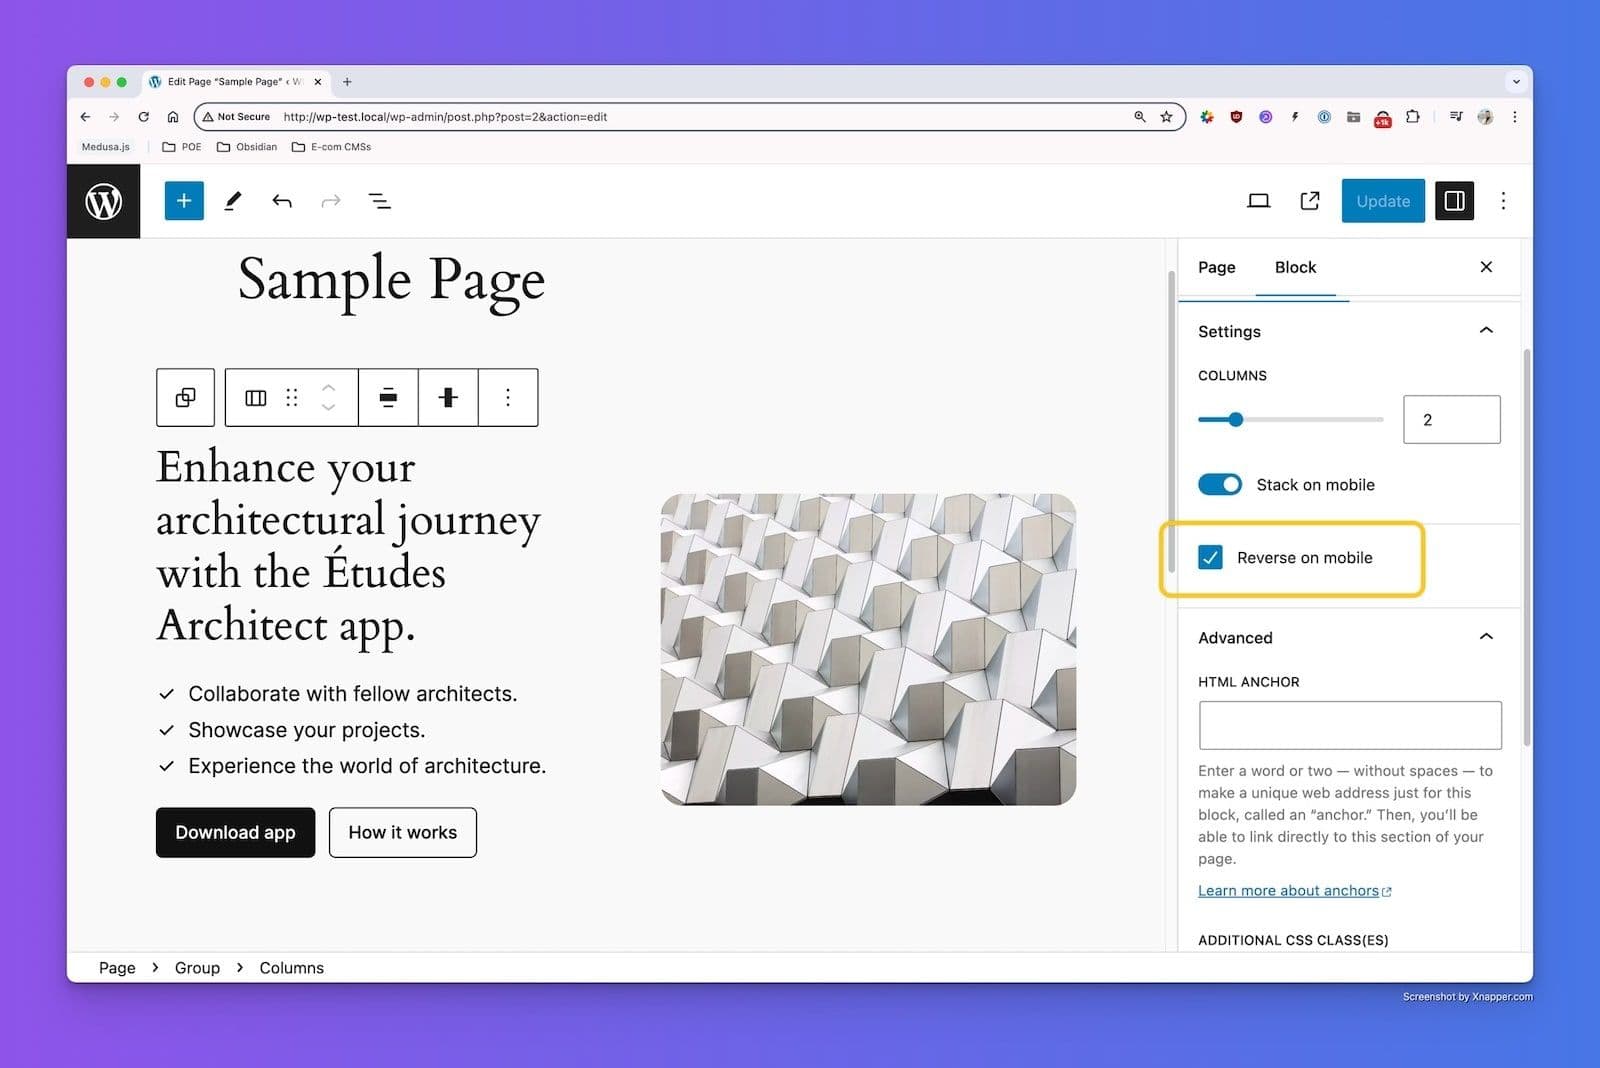
A common use case is a chance to use a custom field in a Gutenberg core block
Consider the following scenario:
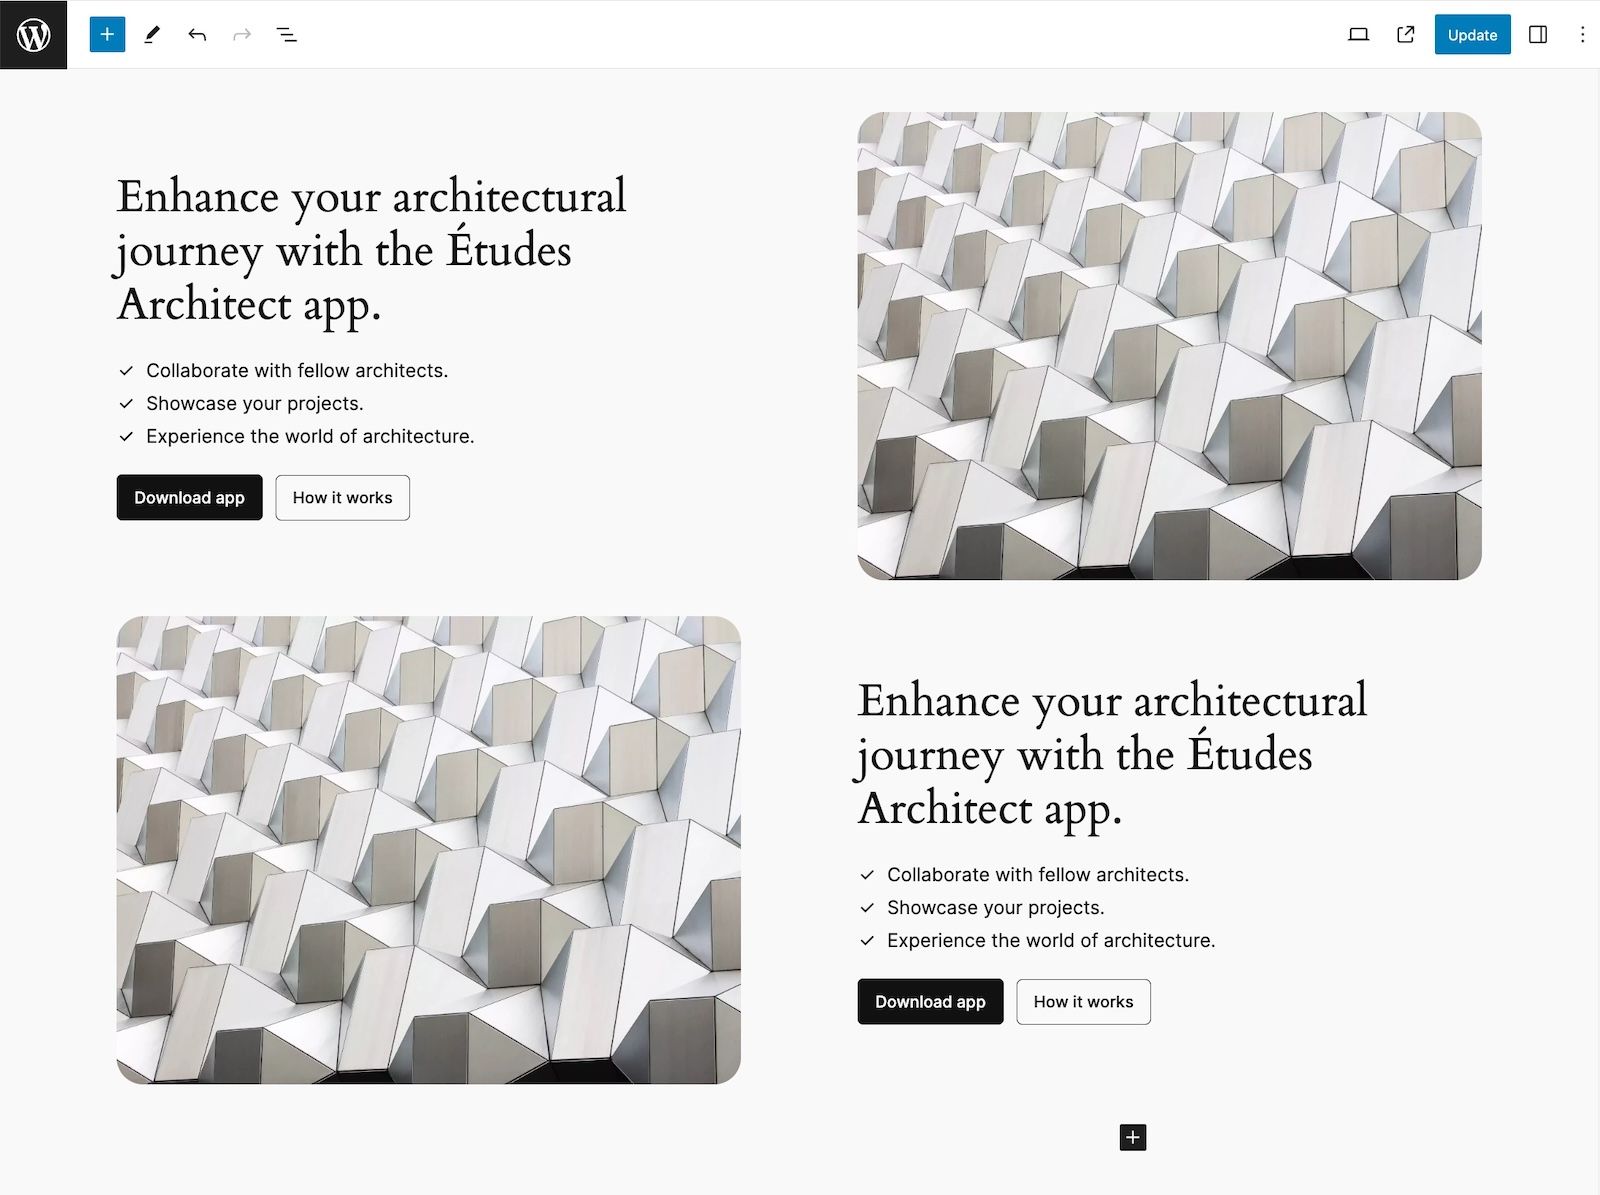
On desktop this situation is good and works perfectly.
But how does it look on mobile?

As you can see, the situation is not ideal here. We'd like to be able to have a structure like TEXT -> IMAGE -> TEXT -> IMAGE. It's actually pretty easy for a developer to fix this. You just need to create a utility class in your code (specifying the order of the columns) and apply it to the columns block when needed.
However, as developers, we try to provide our clients with a good admin experience, so we need to improve their content management experience. This is where adding a custom field to a core block comes in handy. Let's see how to do it!
Scaffolding the plugin with @wordpress/create-block
Navigate through your local website installation into the plugins directory and run
npx @wordpress/create-block core-block-custom-fieldsThe reason we are using @wordpress/create-block is that it creates a very solid base code with the support of @wordpress/scripts, a package that fires up a development environment that will assist us, packing the code and building it for us.
Indeed, you can now enter your new plugin directory via terminal and run
npm run startYou can now go to your WP admin and activate the plugin.

We don't really need all the files that @wordpress/create-block generated for us, so let's get rid of almost all of them inside of the src directory. You have to keep only the index.js file because that's our entry point that @wordpress/scripts will look for.
Open the index.js file and remove all the content.
You should also have a core-block-custom-fields.php file. Open it and remove everything. This is how your file should appear:
<?php
/**
 * Plugin Name:       Core Blocks Custom Fields
 * Description:       Example block scaffolded with Create Block tool.
 * Requires at least: 6.1
 * Requires PHP:      7.0
 * Version:           0.1.0
 * Author:            The WordPress Contributors
 * License:           GPL-2.0-or-later
 * License URI:       https://www.gnu.org/licenses/gpl-2.0.html
 * Text Domain:       core-blocks-custom-fields
 *
 * @package CreateBlock
 */
Feel free to update the information in the above code. Some of these information will be displayed on the plugin directory in the WordPress admin.
The next part of the tutorial is divided in 3 sections: in the first one we register the new attribute for the core block columns, in the second one we add the option to the columns block panel in the editor, and in the third one we're going to filter the output of the block in order to achieve our result.
Enqueueing the script
First of all, let's load our script by enqueueing as we usually do with WordPress. We use the enqueue_block_editor_assets hook that will fire after block assets have been enqueued for the editing interface.
/**
 * Enqueue specific modifications for the block editor.
 *
 * @return void
 */
function rc_enqueue_editor_modifications() {
	$asset_file = include plugin_dir_path( __FILE__ ) . 'build/index.asset.php';
	wp_enqueue_script( 'core-blocks-custom-fields', plugin_dir_url( __FILE__ ) . 'build/index.js', $asset_file['dependencies'], $asset_file['version'], true );
}
add_action( 'enqueue_block_editor_assets', __NAMESPACE__ . '\rc_enqueue_editor_modifications' );
If you set a console.log() in index.js and open a page editor in WordPress admin, you will see the log in the browser console.
Registering the custom attribute
// first of all we import the addFilter() method from @wordpress/hooks
import { addFilter } from '@wordpress/hooks';

// then we implement the addFilter() method
// the first argument is the name of the hook
// the second argument is the namespace
// the third argument is the callback function.
// This function needs to return 'settings' as we are filtering through them,
// modifying the value of it based on specific conditions (in our case, our goal is to update the settings for the core/columns
addFilter('blocks.registerBlockType', 'rc/columns', function (settings, name) {

	// first we check if we are dealing with the settings of the columns block.
	// If not we return settings untouched
	if (name !== 'core/columns') {
		return settings;
	}

	// otherwise we update the content of the settings object
	return {
		...settings,
		attributes: {
			...settings.attributes,

			// here is where we add our new custom attribute
			reverseOnMobile: {
				type: 'boolean',
				default: false
			}
		}
	};
});
The code above is responsible of registering the custom attribute, that in our case is called reverseOnMobile. Check out the comments to understand what the code does in details.
Add the field to the editor interface
Now that we have our brand new custom attribute set, we can proceed by adding the control we need in the admin interface. Add the following code below the previous one:
// InspectorControls is the element that allow us to play with the sidebar and controls of the block
import { InspectorControls } from '@wordpress/block-editor';
// The following ones are the single elements that we need in order to properly build our controls
import { CheckboxControl, PanelBody, PanelRow } from '@wordpress/components';
import { __ } from '@wordpress/i18n';

function Edit(props) {
	// First we create the method responsible of saving the state of the control
	// The attribute we want to save is the custom one we just created
	const setReverseOnMobile = (value) => {
		props.setAttributes({ reverseOnMobile: value });
	};

	// Then we return the controls
	// The CheckboxControl is the element that allow us to display a checkbox in the admin
	return (
		<InspectorControls>
			<PanelBody>
				<PanelRow>
					<CheckboxControl
						label={__('Reverse on mobile', 'rc')}
						checked={props.attributes.reverseOnMobile}
						onChange={setReverseOnMobile}
					/>
				</PanelRow>
			</PanelBody>
		</InspectorControls>
	);
}
We're not done yet. We built our Edit() component, but we still need to let WordPress know that we want this new control to be loaded together with the columns core block UI. To do that we make use of a function provided by @wordpress/compose called createHigherOrderComponent .
import { createHigherOrderComponent } from '@wordpress/compose';

// First, let's filter using 'editor.BlockEdit' hook.
// It allows to modify the edit component.
// Check the docs https://developer.wordpress.org/block-editor/reference-guides/filters/block-filters/#editor-blockedit

addFilter(
	'editor.BlockEdit',
	'rc/columns',

	// We use this function to 'merge' our new edit component with the default edit (provided through BlockEdit)
	createHigherOrderComponent((BlockEdit) => {
		return (props) => {
			// Check if we are dealing with the columns core block
			if (props.name !== 'core/columns') {
				return <BlockEdit {...props} />;
			}

			return (
				<>
					<BlockEdit {...props} />
					<Edit {...props} />
				</>
			);
		};
	})
);
Now we should be able to see our new control in the inspector panel.

Great! Now that we have the custom control enabled we have to make use of it in our frontend.
Apply the custom control to the frontend
Our frontend now is not aware of the changes. In this section we will learn how to make use of our custom field in the frontend.
To do so, WordPress provided us with a nice API that allows us to navigate through the output HTML and edit it based on specific conditions. In particular, we'll make use of the WP_HTML_Tag_Processor class (https://developer.wordpress.org/reference/classes/wp_html_tag_processor/). The description in the docs is very simple and intuitive: "Core class used to modify attributes in an HTML document for tags matching a query." Be sure to check the documentation in order to learn all the possible methods you have available to you for manipulating the HTML. But let's see it in action:
// The function is triggered by the filter we defined after the function. It provides two arguments:
// $block_content: the actual HTML provided by the block
// $block: the general block object with all the related information
function filter_columns_block_render_block( $block_content, $block ) {
// The following lines check for the existence of the custom attribute and if it's set to true
if ( isset( $block['attrs']['reverseOnMobile'] ) && $block['attrs']['reverseOnMobile'] === true ) {
// Here comes in play the WP_HTML_Tag_Processor
// We feed it with the block content and assign the returned value to a variable $p
// In this way is easier to access to it
$p = new WP_HTML_Tag_Processor( $block_content );
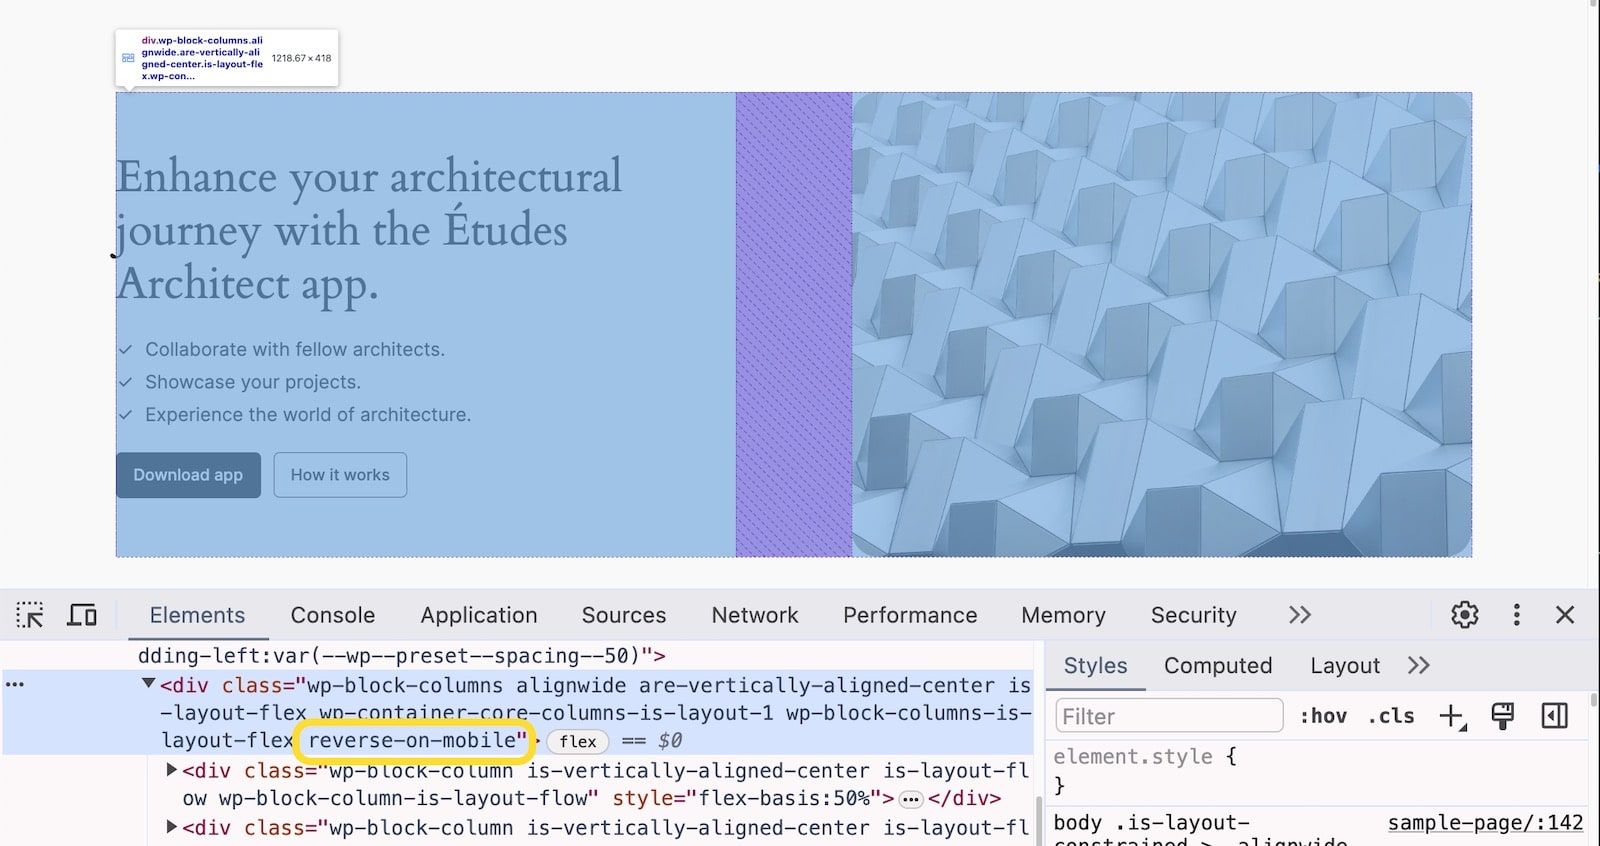
// And here we look for a div tag with the class 'wp-block-columns' and apply the class 'reverse-on-mobile'
if ( $p->next_tag( 'div', 1, 'wp-block-columns' ) ) {
$p->add_class('reverse-on-mobile');
// Don't forget to return the updated HTML
$block_content = $p->get_updated_html();
}
}
return $block_content;
}
// Since we want to edit something that WordPress already provided, we need to filter.
// Very important: note the name of the filter. You will have to edit it based on which block HTML you want to filter
// E.g. if you want to filter the image block the filter name will be 'render_block_core/image'
add_filter( 'render_block_core/columns', __NAMESPACE__ . '\filter_columns_block_render_block', 10, 2 );Now, reload the page on the frontend of the page and inspect the code:
That's awesome! Now the only thing we need to do is to apply our CSS and change the order of the columns when the screen size is under a specific size. I leave that to you.
Comments
Share your thoughts and feedback.